

HD Monitor Calibration - White Balance and Color Bars
/HD Monitor Calibration - White Balance and Color Bars
February 12, 2012
This post is in regards to HD Rec. 709 monitor calibration only. There are several issues relating to standard definition video and monitoring that do not apply to HD.
1. NTSC Setup, or 7.5 IRE (%) Black Level. Setup is for standard definition only. The black portion of HD test signals hit 0 IRE (%) on the waveform.
2. Phase: There is no Phase control for digital HD monitoring. Only CHROMA (saturation) affects picture as Phase relating to monitoring is an analog issue only.
COLOR BAR TEST SIGNALS:
Many cameras and recording decks generate color bars - either the HD SMPTE (Society of Motion Picture and Television Engineers) version, which is this:

SMPTE HD
Or the newer HD specific version, ARIB (Association of Radio Industries and Businesses):

ARIB
Correct use of these test signals will help you properly set your HD monitor's Brightness (black level), Contrast (white level), and Chroma (color saturation level). The process of using either of these color fields is virtually identical. While color bars will help you to setup aspects of your monitor, they do nothing to reveal whether or not it's calibrated, meaning it's accurately reproducing colors and a neutral chroma-free gray scale. This is the most critical component of monitoring and is accomplished through a White Balance Adjustment.
Part 1: Monitor White Balance
When we are calibrating a HD monitor, we are adjusting it so that 100% white is reproduced as completely neutral and chroma free within the Rec. 709 color gamut.
Rec. 709 gamut / color space
Rec. 709 is the standard color space for HD images. It specifies a white point at D65, 6500 degrees kelvin. If this white point is placed correctly, it should ensure that all colors and grayscale within the gamut are accurately reproduced. If it does not, then there are calibration issues that cannot be resolve through a white balance adjustment alone.
When we white balance a monitor we start at D65 and then adjust Red, Green, and Blue gains to push 100% into the correct target white point. As is exemplified in the graphic above, this is represented by a two dimensional chart with x and y coordinates. For LCD's, CRT's, and other legacy displays the coordinates for white within Rec. 709 are x .313 y .329
These adjustments are made using a spectrophotometer or colorimeter aka "probe". The process of white balance adjustment with a probe is similar from monitor to monitor. Some can use a probe to do this process automatically whereas others must be done manually.
An overview of the process, first input a 100% white test signal into the monitor and then use the probe to objectively measure the screen. It will tell where this white image is hitting in the gamut by way of x and y coordinates. From here, RGB gains are adjusted until the probe verifies that white is hitting the correct coordinates, x .313 y .329. If you're using an OLED monitor, you will use different coordinates than x .313 y .329 and you may need to adjust Bias as well to compensate for chroma cast in the dark tones of the picture. This process is very similar to adjusting White Balance, just using 20% neutral gray instead of 100% white.
The most inexpensive way to do a White Balance Adjustment on your monitor is with a free software from Sony used with the i1 Pro and i1 Pro 2 probes. These aren't the most accurate probes available but they are well priced and I've had very good results aligning and matching displays with them.
Use the probe / software and adjust RGB Gains and Bias to hit the correct targets for both 100% White and 20% Gray. Color temperature is denoted by "x" and "y". Luminance level is "Y".
100% White (Gains)
x .313
y .329
Y 100 (studio level)
20% Gray (Bias)
x .313
y .329
Y 2.7 (gamma 2.2)
The x and y points will always be the same for both Gain and Bias. The Y level for Bias will change with the gamma setting be it 2.2, 2.4, or 2.6. Consult your manufacturer!
AN IMPORTANT NOTE ON MONITOR GAMMA:
Rec. 709 doesn't actually specify a gamma but the de facto standard is 2.2. The newer Rec. 1886 specs gamma at 2.4. This topic is beyond the scope of this post so I've written a separate article on it. Rec.ommendations for Display Gamma >>> For simplicities sake, this article assumes we are working at a gamma of 2.2
Once we're successfully white balanced and selected gamma, we can now use color bars to finish the calibration process.
Part 2: Setting Brightness, Contrast, and Chroma Level with Color Bars
AN ANALYSIS OF THE SMPTE HD COLOR FIELD:
The components of this test signal are 75% Contrast Color Bars (Yellow, Cyan, Green, Magenta, Red, Blue), 20% Blue Chip, 10% Purple Chip, 75% Contrast White Chip, 100% Contrast White Chip, 0% Black chips, and The Pluge. When using this test signal to set Brightness, Contrast, and Chroma, all you really need to concern yourself with are the 75% Color Bars, 100% White Chip, and Pluge. The 20% Blue Chip and 10% Purple Chip fall along the IQ Line on the Vectorscope for verification that the color information in the test signal is accurately centered on the scope.
The Pluge will help you set your Brightness (Black Level). It consists of a -3.5% (IRE) chip on the left, 0% chip in the middle, and 3% chip on the right.

Here are SMPTE Color Bars with lifted blacks so you can see the pluge better:

Here's the same signal's luma waveform. This helps to see where everything in the field is hitting in terms of level, particularly the pluge.

And Vectorscope. You can see that each of the color bars lines up perfectly with thier targets indicating that these are pure, undiluted primary and secondary video colors. If this was a 100% contrast color field, the vectors would land perfectly in their little targets; R = Red, Mg = Magneta, B = Blue, Cy = Cyan, G = Green, Yl = Yellow.

SETTING BRIGHTNESS, CONTRAST, AND COLOR WITH HD SMPTE BARS:
1. Set your gamma to 2.2 and White Balance to D65 (or User if you have done a custom White Balance Adjustment). Set your Brightness, Contrast, and Chroma to their default levels. If you have a display that can be custom white balanced, make sure that you're aligned before starting this. If you're working with a facility on a project, they can send a technician with a probe to you and he can do it for you. Or you can talk to you manufacturer and get a list of recommended probes for use with your display along with x,y (Color Temperature), and Y (Luminance) targets so you can do it yourself. Once you're there, send the HD SMPTE test signal to your monitor via HD-SDI. This is best done in a dark environment so if you're outside or in an unshielded location, try and keep as much ambient light and direct light off the display as you can.
2. Everyone has their own way of doing this. I start with Contrast which is the most subjective. Looking at the 100% white chip, turn the contrast up until it visually stops getting any brighter. Now back it off a little bit. This will be different on every display and really the smart way to do is with a probe that reads Luminance level.
3. By default, increasing Contrast will also somewhat raise the black level. Now use the pluge and set your Brightness so that the left (-3%) pluge chip disappears into the surrounding 0% black field. The right chip which reads 3.5% on the waveform should be just barely visible.
4. Now check your contrast again. Is the 100% white chip still hitting peak white? If you need to adjust, make sure to go back and check your pluge again. By going back and forth between these 2 adjustments, you should be able to arrive at a satisfactory black and white level.
5. Now check Chroma. Your monitor most likely has some sort of Blue Only feature. This is used to help you correctly set your color saturation level with Chroma. Turn it on and have a look.
If it looks something like this, you're in good shape.

If you're looking at something like this, then the Chroma level is incorrect.

Adjust the Chroma level on the display until you're looking at solid, alternating bars of equal value. The larger top portion of each individual bar needs to blend into the smaller section beneath it.
6. If you find that you have to make some adjustments to Chroma, this could up slightly changing your overall contrast so turn Blue Only off and check the pluge and 100% white chip again. By tweaking back and forth between all of these adjustments, you will be able to find the most accurate settings your monitor can produce. Please note that some monitors don't have Blue Only but can display in Monochrome. The Chroma calibration process with Monochrome is identical to Blue Only.
At the end of the process you should be looking at something like this:

AN ANALYSIS OF THE ARIB COLOR FIELD:
This test signal has a greater variety of components than it's SMPTE relative. It contains the same 75% Contrast Color Bars, with the addition of neutral gray chips at various luma levels, and pluge with more steps (-2%, 2%, and 4%) that I suppose offer a bit more finesse for setting black level with Brightness.
Here's a handy diagram detailing what's what in the ARIB:
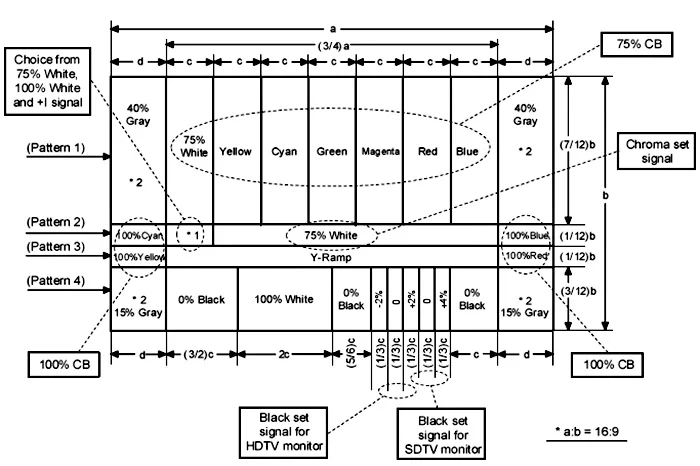
Here's the luma waveform of the signal. Note the 0%-100% gradient that ramps through the middle of the field and the pluge at -2, 2, and 4%.

SETTING BRIGHTNESS, CONTRAST, AND COLOR WITH ARIB BARS:
Though it looks radically different, on principle it's the same as the SMPTE. Follow the exact same steps outlined above when using this signal to arrive at correct Brightness, Contrast and Chroma levels.
The biggest difference is with the pluge. When using this signal, the middle (2%) and right (4%) pluge chips should be barely visible with the the -2% chip blending into the surrounding 0% black field.
When setting Chroma with Blue Only, this is what you should be looking at with the correct level:

And when you're all done, this is what you should be looking at:
SMPTE 100% COLOR FIELD:

Some recording decks will output these but very few cameras will. I don't think this is as useful a calibration signal as there's no pluge to help you set black level. It's good for checking saturation on displays or if for some reason you needed to check a 100% signal in a video system. This field contains the 3 primary video colors (Red, Green, and Blue) and 3 secondary colors (Yellow, Cyan, and Magenta) at 100% contrast along with a 0% Black Chip and 100% White Chip.
On the vectorscope at Gain x2, you can see the colors hit their 100% targets spot on.

When looking at this color field with Blue Only and if your Chroma level is set correctly, you should be seeing something like this - bars of equal and alternating value:

 © 2021 Bennett Cain / All Rights Reserved /